Optimizing Euro Truck Simulator 2 VR Performance: System Requirements and Settings Guide
Euro Truck Simulator 2 in VR offers an unparalleled level of immersion, bringing the trucking experience to life like never before. However, achieving smooth and comfortable VR gameplay can be demanding, requiring careful configuration to balance visual fidelity and performance. This guide delves into essential settings adjustments to optimize your Euro Truck Simulator 2 VR experience in 2022, ensuring your virtual trucking runs smoothly.
One of the primary areas for performance tuning lies within the game’s configuration file. Directly modifying this file allows for adjustments beyond the standard in-game menus, particularly affecting VR-specific rendering and frame generation techniques. Accessing and editing this file is crucial for achieving optimal VR performance in Euro Truck Simulator 2.
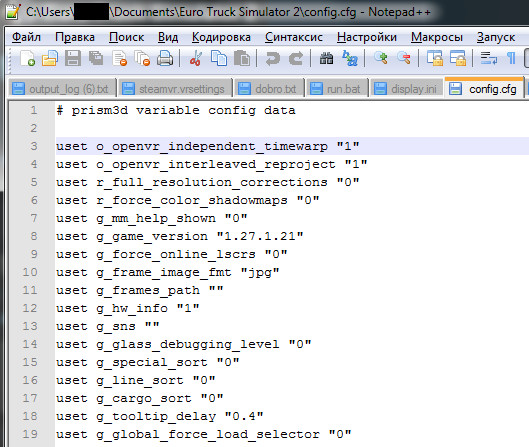 Navigating to the Euro Truck Simulator 2 config.cfg file in Documents folder for VR performance tuning, showing file path C:Users-username-DocumentsEuro Truck Simulator 2config.cfg, essential for adjusting advanced graphics settings and improving frame rates in virtual reality mode.
The configuration file, named config.cfg, can be found in your Documents folder, specifically within the Euro Truck Simulator 2 directory. The full path is typically: C:Users-username-DocumentsEuro Truck Simulator 2config.cfg. Remember to replace “-username-” with your actual Windows username. Opening this file with a text editor like Notepad allows you to tweak advanced settings that directly impact your VR performance.
A critical aspect of VR performance is maintaining a stable and high frame rate. Since Euro Truck Simulator 2 can be GPU-intensive, especially in VR, achieving a consistent 90 FPS (frames per second) on many systems can be challenging. To address this, various frame generation techniques, such as reprojection and timewarp, are employed to smooth out the VR experience even when the game cannot natively render at the target frame rate.
The game incorporates its own timewarp and reprojection technologies, developed before the widespread adoption of solutions from Valve (SteamVR) and Oculus. These in-game solutions can still be beneficial, particularly for users with older hardware or specific VR setups. However, for most modern setups, especially those with NVIDIA GPUs or newer AMD GPUs on Windows 10, disabling the in-game reprojection and relying on the more advanced, driver-level implementations from SteamVR or Oculus is generally recommended for better performance and visual quality.
To disable the built-in timewarp and reprojection, locate the following lines in your config.cfg file and set their values to “0”:
uset o_openvr_independent_timewarp "0"
uset o_openvr_interleaved_reproject "0"
After making these changes and saving the config.cfg file, launch SteamVR and access its settings. Ensure that asynchronous reprojection is enabled and interleaved reprojection is disabled within SteamVR settings. Oculus users should similarly enable asynchronous timewarp or spacewarp within the Oculus settings panel. These settings allow the VR runtime to intelligently smooth out frame rate fluctuations, enhancing the perceived fluidity of the VR experience.
Conversely, for users with older AMD Radeon GPUs (pre-4xx series) or those running Windows 7 or 8.1 with OpenVR headsets, the in-game timewarp and interleaved reprojection might be the only available options. In such cases, you would enable these in-game settings by setting their values to “1” in the config.cfg file:
uset o_openvr_independent_timewarp "1"
uset o_openvr_interleaved_reproject "1"
Remember to disable asynchronous and interleaved reprojection in SteamVR settings when using the in-game reprojection. It’s also crucial to re-enable interleaved reprojection in SteamVR for other VR games that might benefit from it, as this setting is specifically adjusted for Euro Truck Simulator 2 in this configuration.
Beyond configuration file tweaks, adjusting in-game graphics options is equally important for VR performance. Certain visual effects, while acceptable in standard gameplay, can be detrimental to VR clarity and frame rates. Specifically, Depth of Field should be disabled as it introduces blurriness that is particularly noticeable and uncomfortable in stereoscopic 3D VR. Similarly, in-game Anti-aliasing should be turned off. The in-game anti-aliasing in Euro Truck Simulator 2 primarily applies a blurring effect, which is counterproductive in VR where sharpness and clarity are paramount. Supersampling, discussed later, is a far more effective method of achieving anti-aliasing in VR.
The Scaling option within the in-game graphics settings does not affect the VR rendering resolution and should be set to 100%. This setting primarily impacts the 2D rendering of the game and has no bearing on the VR experience. For improving visual fidelity in VR through anti-aliasing, supersampling is the recommended approach.
Supersampling is a crucial technique for enhancing visual quality in VR. It renders the game at a higher resolution than the native display resolution of your VR headset and then downsamples it, resulting in sharper textures, reduced aliasing, and overall improved clarity. In Euro Truck Simulator 2 VR, supersampling is primarily controlled through the r_manual_stereo_buffer_scale setting in the config.cfg file, not the in-game scaling option.
To enable supersampling, locate the line uset r_manual_stereo_buffer_scale "1" in your config.cfg file. The default value is “1”, which means no supersampling. Increasing this value applies supersampling. For example, setting it to "1.75" will render the game at a resolution 1.75 times higher in both width and height before downsampling.
uset r_manual_stereo_buffer_scale "1.75"The optimal supersampling value depends heavily on your graphics card’s capabilities. For example, a mid-range VR-capable card like an NVIDIA GeForce GTX 1060 or AMD Radeon RX 580 might handle a supersampling value of “1.5” to “1.75” reasonably well. If you experience frame rate drops or stuttering, reduce the r_manual_stereo_buffer_scale value to improve performance. Experiment to find the highest value that provides a smooth and visually pleasing experience on your system.
It’s important to note the difference between how SteamVR supersampling and the r_manual_stereo_buffer_scale setting work. SteamVR calculates its supersampling multiplier based on the increase in the number of pixels, whereas r_manual_stereo_buffer_scale uses a linear multiplier that affects both the width and height of the rendered image. Therefore, a value of “2” in r_manual_stereo_buffer_scale is roughly equivalent to a 4x supersampling in SteamVR in terms of pixel count increase.
By carefully adjusting these configuration file settings, in-game options, and supersampling values, you can significantly optimize your Euro Truck Simulator 2 VR experience, achieving a balance between visual quality and smooth, immersive gameplay in 2022 and beyond.