Upgrading Your Telwin MIG 180-2 Welder to Euro Torch Compatibility
Converting your Telwin MIG 180-2 welder to accept a Euro torch is a popular modification for enhanced performance and versatility. Many welders find the standard torch limiting, and upgrading to a Euro connection opens up a wider range of torch options, including the commonly used MB25. This guide addresses the process of converting a Telwin MIG 180-2, focusing on integrating a gas solenoid for optimal functionality with your new Euro torch setup.
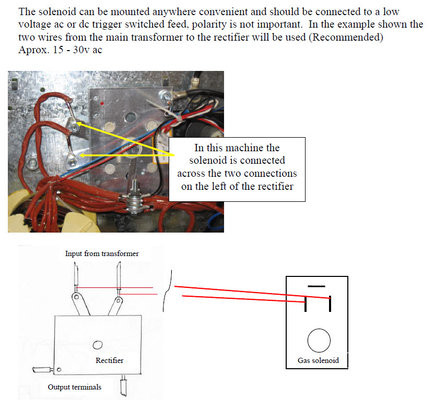
The original Telwin MIG 180-2 torch often utilizes a mechanical gas valve. Switching to a modern Euro torch like the MB25, which lacks this mechanical valve, necessitates the installation of a gas solenoid. This solenoid electrically controls the gas flow, synchronizing it with the welding process. The key challenge lies in correctly wiring this solenoid to work seamlessly with the welder’s trigger mechanism.
The user in the original forum thread, woolfos, encountered this exact problem when attempting to convert his Telwin MIG 180-2. He successfully connected the wires for the wire feed but struggled with the gas solenoid wiring. His initial setup used an MB25 Euro torch and an adapter, maintaining the original two-wire configuration for the trigger circuit. The core question was how to integrate a gas solenoid, specifically concerning voltage requirements and wiring connections to ensure it activates with the torch trigger.
One recommended solution involves using a 220V solenoid connected to the primary side of the transformer. This approach leverages the welder’s existing circuitry, specifically the contactor or relay that controls power to the transformer. By tapping into this power supply, the gas solenoid activation becomes synchronized with the welding current, triggered by the torch switch.
Locate the relay on the PCB that manages power to the power selector switch. This relay, often a black box component, is key to finding the correct connection points. The wires leading from this relay to the power selector switch are where the gas solenoid should be connected. This ensures the gas solenoid is energized whenever the welding current is active, controlled by the torch trigger.
When connecting the 220V gas solenoid, ensure it is wired in parallel with the transformer’s primary circuit. This means the solenoid will receive power whenever the transformer is energized for welding. It’s crucial to identify the correct wires – typically those connected to the relay controlling the transformer primary – to avoid incorrect wiring and potential damage. Always disconnect the welder from the mains power supply before making any electrical connections.
For users considering this modification to their Telwin MIG 180-2 or similar welders, it’s essential to proceed with caution and ideally consult with someone experienced in electrical wiring, especially mains voltage circuits. Incorrect wiring can be dangerous and could damage your welder. However, by carefully following these guidelines and understanding the basic electrical principles, converting your Telwin MIG 180-2 to Euro torch compatibility, potentially saving on costs compared to purchasing a new machine, becomes a manageable DIY project.

